After creating a new note you can press CTRL+SHIFT+I to automatically insert the metadata about the author (you) and an optional link to the following note.
Select Empty chapter template or create one with your name and link if you want to reuse it.
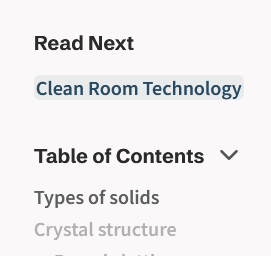
If nextnote is present the website will create a dedicated link like in the picture below.
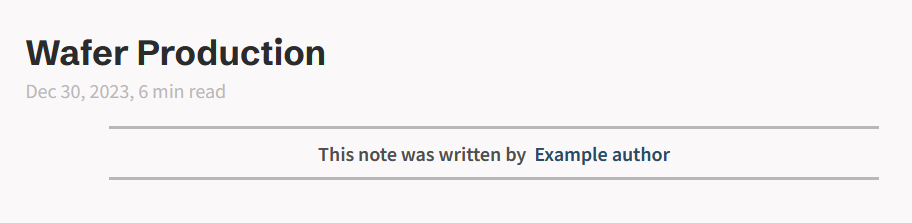
The author will be credited at the top of the note, if you also add a link in the authorlink field, this will be shown as well like in the picture below.
Multiple authors and their respective links can be added by separating them with commas e.g.
You can change the text shown by adding a pipe | followed by the text you want. For example Clean Room Technology[[Clean Room Technology]] can be show as clean room[[Clean Room Technology|clean room]].
You can have the following types of links:
Link to another note: Doping written as [[Doping]]
Link to a header of this note: Text decoration written as [[#text-decoration|Text decoration]]
Link to a section of this note: ^ed057f (the tag is added automatically by obsidian, you just need to write [[^]] and select the correct block from the popup menu)
Link to a section of another note: you can combine the previous links as follows ^0fa6e1
If you want to add a link to an external website use this format [random link](url):
You can embed an entire document or part of it in another note by adding an exclamation mark ! before the correct link, for example ![[#text-decoration|Text decoration]] will appear as:
This method is based on wafer bonding and thinning, the name stands for “Bond and Etchback Silicon On Insulator”. In this technique, two wafers with an oxide layer on the surface are bonded together.
After bonding, most of the top wafer is polished away, leaving a structure with a thin top silicon layer, a buried oxide and a full wafer below.
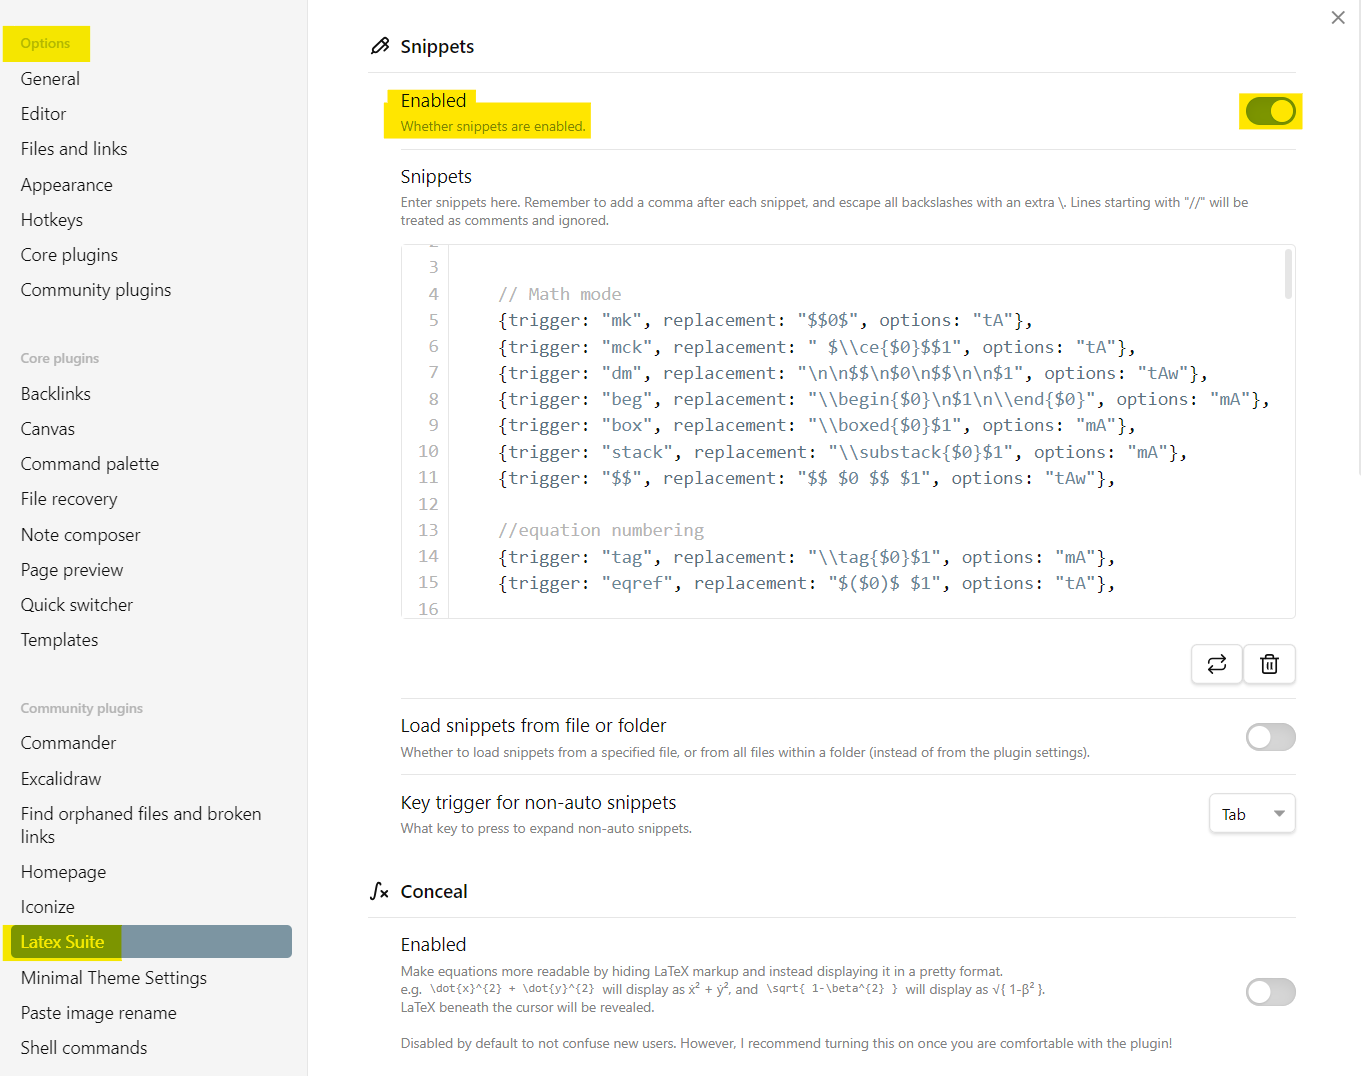
By default the Latex suite plugin "shortcuts" are disabled. Go into the plugin settings and enable them:
Create a formula
Inline formula
Latex blocks can be inserted inline by placing the content between two $ signs like this: $\int_{-\infty}^{+\infty} f(x) \, dx$ will be rendered as:
Separate formula
If you want to place the latex formula in a separate block you need two $ signs like this:
$$\int_{-\infty}^{+\infty} f(x) \, dx $$
will be rendered as:
If you use the Latex Suite”plugin you can find all the shortcuts in the plugin settings. For example you can type @a and it will be converted to \aplha, or type Rvec to get \vec{R}.
The plugin automatically replaces some words, if you don’t like this press CTRL+Z to undo the replacement or delete the appropriate line in the plugin settings.
Inline Latex environment
Type mk anywhere in the file
Latex environment
Type dm anywhere in the file
Greek letters
Type @ followed by the corresponding Latin letter, e.g. @a will become .
Some letters have two versions, for example (\varepsilon) and (\epsilon) can be created with @e and @@e.
Infinity
Type ooo to get
Fractions
Typing a slash / after something will automatically create a fraction like
Other shortcuts
Type:
sr for ^2
sq for \sqrt{} ()
cb for ^3
ee for e^{}
.. for \cdot ()
<= for leq ()
EF for E_F (Fermi energy)
=> for \implies ()
Down for \Downarrow ()
~= for simeq ()
brk for \braket{} ()
and so on.
Vectors and stuff on top of letters
Type the letter you want to vectorize followed by vec, bar, hat, tilde, e.g. Gvec to get \vec{G}, Gtilde to get , etc.
Number subscript
If you write a number after a letter or symbol it will automatically become a subscript, e.g. a0 will become
Integrals
Type dint and you will get with the selected, you can type what you want and then press TAB to move to the other fields. You can also type int to get
Summations
Same as the integrals with dsum and sum
Aligned equations
To align equations you need to be in the align environment. This can be done by typing align, which will create \begin{align} \end{align} or by selecting pre-existing text with the mouse and pressing SHIFT+A, which will surround the text with the correct environment. Inside align the symbol & will specify what has to be aligned with what. && can be used to align text at the end of the line. Use \\ to go to a new line.
Can be created inside the cases environment, typing cases will create \begin{cases} \end{cases}. Similarly to the previous case && can be used to align stuff at the end of the line.
\begin{cases}0 && x \leq 0 \\1 && x > 0\end{cases}
Boxed equations
Can be created with \boxed{}
\boxed{y = ax + b}
Equation number
The number of the equation at the end of the line can be created with \tag{} (the plugin will automatically expand tag) :
y = ax + b \tag{3}
Command palette
You can open the command palette by pressing CTRL+SHIFT+P or by selecting the >_ icon in the left bar
Excalidraw
Excalidraw drawings can be created using the Excalidraw plugin and should be placed in the attachments/excalidraw folder of the current file.
To create a drawing right click on the folder and select “Create new drawing”.
When saving the drawing a .svg file with the same name will be created automatically. This is the file that should be transcluded in the note.
Don't transclude the excalidraw drawing itself, only the svg.
You can transclude the last edited drawing by pressing CTRL+SHIFT+E or selecting “Excalidraw: Embed the most recently edited drawing” in the Command Palette
Tip
If you want to edit a drawing, click on it and press CTRL+SHIFT+O or select “Excalidraw: Open Excalidraw drawing” in the Command Palette
Latex in a drawing
To add Latex to a drawing press CTRL+SHIFT+L or search for “Excalidraw: Insert LaTeX formula” in the Command Palette
Callouts
You can add callouts like this
>[!tip] Tip callout
>
>text
Tip callout
text
Foldable callouts
You can make a callout foldable by adding a plus (+) or a minus (-) directly after the type identifier.
A plus sign expands the callout by default, and a minus sign collapses it instead.